Random Projects
Four Finger Keyboard
I’ve been a bit of a sucker for obscure and novelty keyboards ever since, as a child, I marvelled at a photo of an ergonomic Dvorak keyboard in a technology annual. In a recent Google “rabbit hole” session, I stumbled across the Kee4™ keyboard by Citta Consulting Inc. and, after playing with their Javascript demo for a while, decided to make my own as a fun project over the New Year break. The basic premise of this minimalist keyboard is that characters are typed using a combination of 1 or 2-finger keypress sequences. To really understand it, I encourage you to read their site and try the online demo.
Hardware
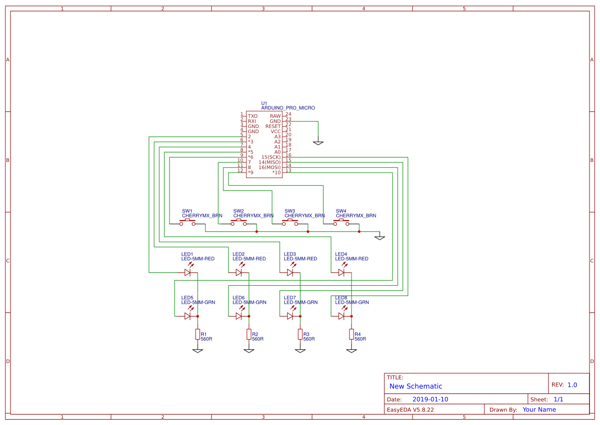
To begin, I grabbed an Arduino Pro Micro (to take advantage of its ability to appear as a USB keyboard), 4 tact switches and some LEDs from the bits box. I built-up a basic circuit on a breadboard - it’s quite simple, as can be seen from the schematic, because the clever stuff happens in code:
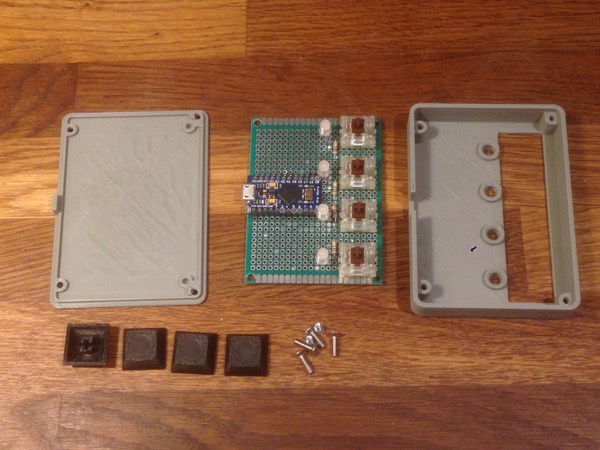
After I was satisfied that the basic concept worked, I ordered some Cherry MX brown keys on eBay. Rather than have separate LEDs for regular and lock modes as I did in my prototype, I decided to use 2-colour LEDs (actually 3-colour because I already had some, but I’m not using the blue channel) for the final build. It was pretty simple to solder up on a 60x80mm protoboard (apart from the bit where I accidentally ripped the USB connector off the first Pro Micro and had to desolder all its pins to replace it). To finish the hardware, I designed a simple 2-part case in OnShape and printed some keycaps from Thingiverse. Here are the finished parts:
Software
With 4 buttons and a need to identify which keys have been pressed, and in which order, I decided to use a simple binary scheme. Each button represents one bit with the lowest bit on the right. Sequences are represented as hex strings. Using this system, the single key sequence for the “e” character would be “2”, a ‘rock’ key sequence for the “s” character would be “262” and a ‘roll’ key sequence for the “t” character would be “264”. Each time the key states change, the current state is appended to the buffer. The end of a sequence is represented by all keys being released (ie: “0”). Here’s how the key sequence is built-up:
void loop() {
    int btnsState = 0;

    for (int i = 0; i < 4; i += 1) {
        int btn = BTN_PINS[i];

        if (digitalRead(btn) == LOW && debounce(btn)) {
            btnsState += 1 << i;
        }
    }

    // Keys released; end of sequence
    if (btnsState == 0 && buf != "") {
        processBuffer(String(buf));
        buf = "";
    }

    [...]

    // Append new button states to the buffer
    else if (btnsState != 0 && !buf.endsWith(String(btnsState, HEX))) {
        buf += String(btnsState, HEX);
    }
}
To process the sequence, we use a two-step approach. First we convert the hex representation of the sequence to a numeric index (0-28) by looping through the MAP array until we find the sequence we’re looking for:
const String MAP[28] = {
//  " ", "n",   "p",   "j",   "l",   "i",   "w",
    "8", "8c8", "8a8", "898", "8c4", "8a2", "891",
//  "a", "m",   "f",   "g",   "o",   "h",   "c",
    "4", "4c4", "464", "454", "4c8", "462", "451",
//  "e", "r",   "s",   "x",   "y",   "t",   "v",
    "2", "2a2", "262", "232", "2a8", "264", "231",
//  "_", "b",   "k",   "z",   "u",   "d",   "q"
    "1", "191", "151", "131", "198", "154", "132"
};

[...]

int index = -1;

for (int i = 0; i < 28; i += 1) {
    if (MAP[i] == buf) {
        index = i;
        break;
    }
}

if (index >= 0) {
    [... process keypress combination ...]
Then, assuming we have a valid index, we get the character at the index from the appropriate character list for the current mode. Here’s how we do that:
const String NORMAL = " npjliwamfgohcersxytv_bkzudq";
const String SHIFT  = "_NPJLIWAMFGOHCERSXYTV_BKZUDQ";
const String NUM    = " *\\-139_+,&257=/.#46^_%|$08@";
const String LANG   = " ñpjlïwámfgóhçérsxýtv_bkzúdq";
const String PROG   = " *\\-{[<?+,&}?~_/.#]`^_%|$>£@";
const String CTRL   = "_:?^^^^_;,^^^^_!.(^^^_'\")^^^";

[...]

char c = "";

switch (mode) {
    case MODE_NORMAL:
        c = NORMAL.charAt(index);
        break;

    case MODE_CTRL:
        c = CTRL.charAt(index);
        break;

    case MODE_SHIFT:
        c = SHIFT.charAt(index);
        break;

    case MODE_NUM:
        c = NUM.charAt(index);
        break;

    case MODE_LANG:
        c = PROG.charAt(index);
        break;
}
The original Kee4 has a language mode which provides access to accented characters. I don’t see myself using this so I’ve replaced it with one more suited to my typical typing (programming). I kept the language string in the code in case I change my mind or someone else decides to use my code and wants it.
Some keypresses represent non-character keyboard buttons or combinations (eg: arrow keys, CTRL+home, etc). I chose to represent these with specific characters (‘_’ for mode changes and ‘^’ for buttons) then matched these cases in conditional logic. Mode changes are done like this:
if (c == 95) { // '_' indicates mode change
    if (!lock) {
        if (mode == MODE_NORMAL) {
            setMode(MODE_CTRL, false);
        } else if (mode == MODE_CTRL) {
            if (buf == "8") {
                setMode(MODE_SHIFT, false);
            } else if (buf == "4") {
                setMode(MODE_NUM, false);
            } else if (buf == "2") {
                setMode(MODE_LANG, false);
            } else if (buf == "1") {
                setMode(MODE_CTRL, true);
            }
            [...]
Special characters are handled like this:
} else if (c == 94 && mode == MODE_CTRL) { // '^' indicates special character
    if (buf == "132") { // up
        Keyboard.write(KEY_UP_ARROW);
    } else if (buf == "154") { // left
        Keyboard.write(KEY_LEFT_ARROW);
    } else if (buf == "198") { // home
        Keyboard.write(KEY_HOME);
    } else if (buf == "231") { // down
        Keyboard.write(KEY_DOWN_ARROW);
    } else if (buf == "264") { // backsp
        Keyboard.write(KEY_BACKSPACE);
    } else if (buf == "2a8") { // ctrl l?
        pressKey(KEY_LEFT_CTRL);
        [...]
The pressKey function has a few steps to keep track of persistent key presses (eg: CTRL, ALT, etc), storing which key was pressed and when:
int releaseNext = 0;
int pressed = 0;

[...]

void pressKey(int key) {
    if (releaseNext > 0 && key == pressed) {
        Keyboard.release(key);
        pressed = 0;
        releaseNext = 0;
    } else {
        Keyboard.press(key);
        pressed = key;
        releaseNext = 2;
    }
}

[...]

// At the end of processBuffer()

    if (releaseNext == 1) {
        Keyboard.release(pressed);
        pressed = 0;
        releaseNext = 0;
    } else if (releaseNext == 2) {
        releaseNext = 1;
    }
Finally, to let the user know the keyboard is ready, I added a quick LED flash sequence to setup:
for (int i = 1; i < 4; i += 1) {
    digitalWrite(MODE_LED_PINS[i], HIGH);
    delay(flashDur);
    digitalWrite(MODE_LED_PINS[i], LOW);
}

digitalWrite(MODE_LED_PINS[0], HIGH);
delay(flashDur);
digitalWrite(MODE_LED_PINS[0], LOW);

for (int i = 1; i < 4; i += 1) {
    digitalWrite(LOCK_LED_PINS[i], HIGH);
    delay(flashDur);
    digitalWrite(LOCK_LED_PINS[i], LOW);
}

digitalWrite(LOCK_LED_PINS[0], HIGH);
delay(flashDur);
digitalWrite(LOCK_LED_PINS[0], LOW);
I didn’t implement debounce in my initial implementation and it doesn’t seem to suffer too much for it, but I will probably use the Arduino debounce library at some point. I’ll update Github if/when I do.
Conclusion
Here’s the finished keyboard connected to my laptop:
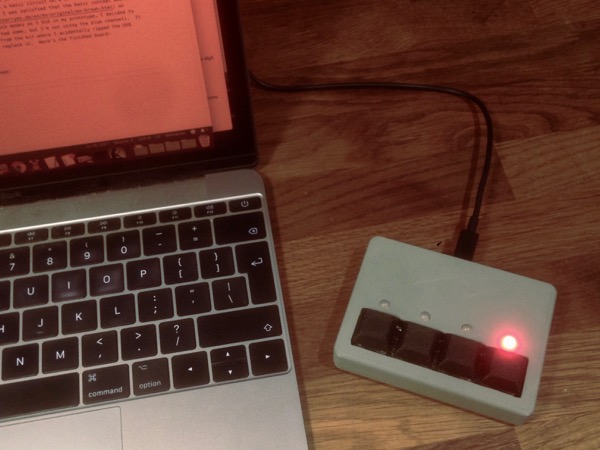
It was a simple and fun project. The keyboard itself is reasonably easy to use but, because there are no visual prompts on the device, it does require a separate cue sheet until you’ve committed the various key combinations to memory. I typed part of this article on it and I didn’t exactly achieve the 50 words per minute I’m used to on a regular keyboard but my speed did pick up over time. I can’t see this replacing my usual keyboard for day-to-day typing (unless I’m involved in a freak accident which deprives me of one hand) but it’s a fun novelty to learn and use so I’m sure to use it occasionally. If I become reasonably proficient with it, I might even use it as an alternative keyboard for my phone or tablet.
Resources
- Thingiverse: 4-finger keyboard case
- Thingiverse: Cherry MX keycaps (type: DSA)
- Github: Arduino code
- Sparkfun: Pro Micro USB keyboard tutorial
Posted on 06 January 2019
